Skip to content
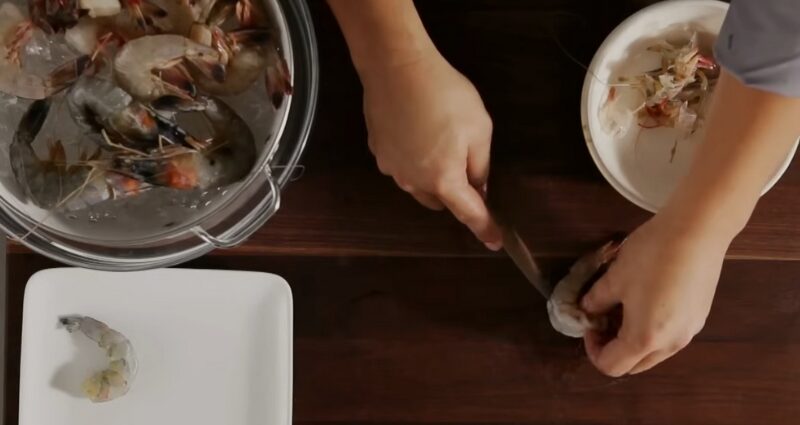
I used to avoid buying raw shrimp. Every time I looked at a bag with the shells still on, I’d think, “That’s too much work.”
But once I finally learned how to devein shrimp properly, both with a knife and without, I realized it’s not a big deal. Now I do it all the time without thinking twice.
If you’ve ever wondered what the “vein” is, or if you even have to remove it, here’s the short version: it’s the digestive tract, and while it’s not harmful to eat, it can be gritty or unappetizing.
If you’re prepping shrimp for anything where texture matters, grilling, sautéing, or tossing in pasta, it’s worth the couple of extra minutes to clean them up. And once you know how to do it, it’s easy to get into a rhythm.
Here’s exactly how I do it, knife or no knife, without making a mess or wasting shrimp.
Tools You Can Use to Devein Shrimp
You don’t need anything fancy, but some tools make the process easier, especially if you’re cleaning a big batch. Here’s a quick breakdown:
| Tool | Best For | Pros | Cons |
| Paring Knife | Most common, easy to control | Precise, good for beginners | Requires a steady hand |
| Toothpick | Shell-on shrimp | Easy to use, minimal cleanup | Slower for large batches |
| Shrimp Deveiner Tool | Fast peeling + deveining | Efficient, does two jobs at once | Slight learning curve |
| Skewer | Alternative to a toothpick | Works the same way | Can break soft shrimp if rushed |
| Kitchen Shears | Shell removal | Easy shell removal without tearing | Doesn’t devein |
Step 1: Thaw and Prep Your Shrimp
If you’re using frozen shrimp, start by thawing them properly. Skip the microwave—shrimp cook fast and can turn rubbery in seconds.
Here’s how I do it:
- Place shrimp in a colander in the sink.
- Run cold water over them for 5–10 minutes, tossing occasionally.
- Pat dry with paper towels before peeling or cutting.
Keep the shells on for now if you plan to use a toothpick or deveiner tool. If you’ll be using a knife, you might prefer to peel first.
Step 2: Decide Whether to Peel First or Not
View this post on Instagram
This depends on how you’re cooking the shrimp.
| Cooking Style | Leave Shell On? | Why |
| Grilling or broiling | Yes | Shell protects from heat, adds flavor |
| Stir-fry or pasta | No | Shell gets in the way, messy to eat |
| Poaching or boiling | Optional | Shell adds flavor to broth |
To peel:
- Start at the legs. They peel off easily.
- Remove the shell by pulling from the underside around the curve.
- You can leave the tail on if you want it to look a little nicer (and it gives people something to hold while eating).
Step 3: Deveining With a Knife (My Go-To Method)
If I’m doing more than a handful, I almost always grab a small, sharp paring knife. Here’s exactly how I go about it.
- Place the shrimp on a cutting board, back side facing up (the curved part).
- Make a shallow slit down the length of the shrimp’s back. You don’t want to cut all the way through—just deep enough to expose the vein.
- Use the tip of the knife to lift out the dark vein. Pull gently—it usually comes out in one piece. If it breaks, just rinse the shrimp under cool water to clean up the rest.
- Check the shrimp’s shape. If it feels tight or curls into a full circle, you can use the cut to “butterfly” it slightly for more even cooking.
Step 4: Deveining Without a Knife
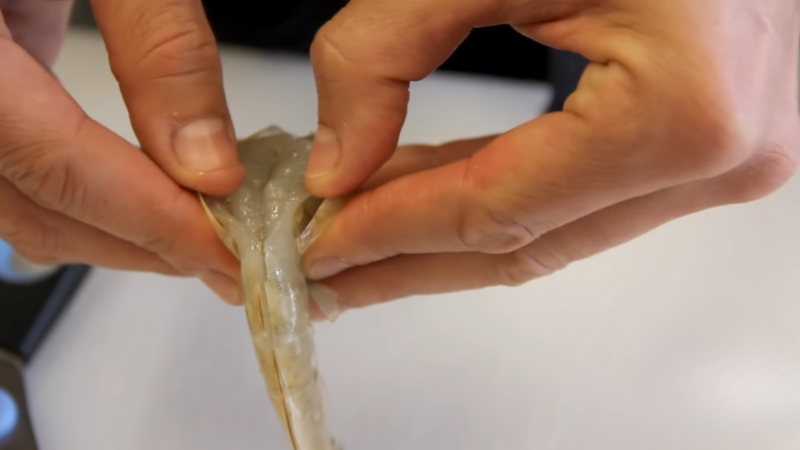
Sometimes I’m too lazy to grab a knife and cutting board, especially if I’m only prepping a few shrimp for something quick like a salad or skewer. That’s when I use a toothpick.
- Hold the shrimp firmly, curve facing up.
- Insert the toothpick about 1/4 inch deep just behind the head, along the back ridge.
- Lift upward gently—you’ll see the vein come loose.
- Pull it out slowly, and you’re done. Rinse if needed.
This works even if the shell is still on, which is great for grilled shrimp or when you’re trying to keep the shape intact.
Step 5: Clean and Dry the Shrimp
After deveining, always give the shrimp a quick rinse under cold water—especially if any of the vein broke during removal. You don’t want that gritty texture hanging around.
Then pat them dry using paper towels or a clean dish towel. Dry shrimp cook better. If they’re wet, they’ll steam instead of sear, and that’s not what you want if you’re after that perfect golden color or slight char.
Optional: How to Butterfly Shrimp
@kaikani How to Butterfly Shrimp 🦐🔪 #LearnFromMe #Shrimp #CookingTips #TikTokCooks ♬ Chilen in Da Club – L.Dre
Sometimes I take an extra step and butterfly the shrimp, especially for frying, stuffing, or nicer plating. It also helps them cook evenly and hold onto marinades better.
- After making the slit to remove the vein, just extend the cut slightly deeper, but don’t go all the way through.
- Gently press the shrimp open like a book.
- You’ll get a flat, wide shape that looks great on a plate.
Quick Recap Table
| Step | What to Do | Tools Needed |
| Thaw + Prep | Rinse under cold water, pat dry | Colander, paper towels |
| Peel (optional) | Remove legs and shell (tail optional) | Hands or kitchen shears |
| Knife Method | Slit back, remove vein | Paring knife |
| Toothpick Method | Slide under the vein near the head, lift, and pull | Toothpick or skewer |
| Clean + Dry | Rinse briefly, pat dry before cooking | Water, towel |
| Butterfly (optional) | Widen back slit for even cooking | Knife, fingers |
Final Thoughts
If you’ve been avoiding raw shrimp because of the deveining step, don’t let it stop you anymore.
Once you get into a rhythm, it’s honestly just a few seconds per shrimp. And whether you’re using a knife, a toothpick, or even a plastic shrimp tool, it’s a simple skill that instantly improves your cooking.
Jumbo shrimp and prawns may look similar, but they have slight differences in texture and taste—something you’ll appreciate once you start cleaning and cooking them fresh.
I don’t bother buying pre-cleaned shrimp anymore. Not because I love extra work, but because I can clean a pound in under 10 minutes, they taste better fresh, and I know they’re done right.
Got shrimp in the freezer? Grab them. Thaw, peel, clean, and cook them however you like—you’ve got this.